Using Business Objects
Everything within Neurons for ITSM is driven by business objects.
•Creating a Stand-Alone Business Object
•Creating a Group Business Object
•Creating an Extension to an Existing Business Object
•Creating a Materialized View Business Object
•About Modifying a Business Object
•Adding Custom Tabs Using Plugins
Creating a Business Object
1.From the Configuration Console, click Build > Business Objects. The application displays the Business Objects workspace.
2.From the right panel in the Create an Object pane, click New Object. The application displays the Business Object: Create New page.
3.Choose an option:
•Stand-alone Business Object: A simple business object where you can define business object fields. Once created, you can extend it. See Creating a Stand-Alone Business Object.
•Group Business Object: A business object that is the base for a group of related business objects. It defines the properties which are common to the business objects in the group. See Creating a Group Business Object.
•Extension To Group Business Object: A business object that extends the properties and behavior of another business object. You can add specific properties and business rules. See Creating an Extension to an Existing Business Object.
•Materialized View Business Object: A complex type of business object. Once created, you can set up to update data from different sources. See Creating a Materialized View Business Object.
Creating a Stand-Alone Business Object
1.From the Configuration Console, click Build > Business Objects. The application displays the Business Objects workspace.
2.From the right panel in the Create an Object pane, click New Object. The application displays the Business Object: Create New page.
3.Click Stand-alone Business Object. The Business Object Create New page appears.
4.Under the Details tab, enter information into the fields.
| Field | Description |
|---|---|
|
Business Object |
A unique name for this business object. The name is stored in the database. |
|
Display Name |
A unique display name for this business object. This name appears to users in the Neurons for ITSM application. |
|
Description |
A brief description of the purpose of the business object. |
|
Default Form |
Optional. The default form for this business object. Choose from the drop-down list. You cannot set a default form until you have created at least one form for this business object. See Using Forms. |
|
Default Search |
Optional. The default saved search for this business object. Choose from the drop-down list. You cannot set a default saved search until you have created at least one saved search for this business object. See Creating a Saved Search. If there is already a default saved search for the business object for a role, that takes precedence over the value entered in this field for users logged in as that role. |
| Contract Memberships | |
|
Contracts |
The composite contract memberships. Click the add icon |
| External Object Synchronization | |
| External |
Defines if this is an external business object, which means that the data comes from an external application. For more information about using external business objects, see Using Web Services with External Data Sources. NOTE: You can only apply this property when you originally create the business object. You cannot apply this property to an existing business object. You cannot set an existing business object to external; instead, you have to create a new business object. Therefore you do not see this section when viewing or editing a business object; only when creating it. |
| Synchronized |
(Only shown if you checked External.) Specifies if you can use a cached version of the data. If you check this option, the application retains a cache of the external data and uses that. If you do not check this option, the application always goes to the external application and uses that data. |
| External Primary Key |
(Only shown if you checked External.) The primary key used by the external application.
You cannot specify this field when you originally create the external business object. You first need to add the primary key field to the business object (see Creating a Field) and then come back to this page and set this value to the new field that you created. When you create the field to be used as the external primary key, ensure that you check Unique.
You can also create an index and use that as the external primary key. See Adding Indexes. |
| Refresh Interval |
(Only shown if you checked Synchronized.) The time, in minutes, after which the application tries to refresh the data from the external application.
This value must be less than or equal to the value of the Time To Live parameter. On-premise users can change the minimum and maximum values of this parameter by updating the web.config file; however, the minimum value cannot be less than one minute. |
| Time To Live | (Only shown if you checked Synchronized.) The time, in minutes, that the data has left before you must refresh the data. If the data is older than this value, the application does not let you use it or save any business objects that use this data. The application displays a message that the data is stale and you must refresh it. |
| Usage Qualifiers | |
|
Commonly Used |
Shows this business object on the Business Objects workspace. |
|
Under Change Control |
When working with a business object derived from the CI and FRS_CIComponents business objects, check to allow its configuration baseline attributes to be copied. |
| Pure Validation Object | Specifies if this is a pure validation object, which indicates that the given business object is used primarily to drive the drop-down fields in other business objects. |
| Special Purpose Fields | |
|
Primary Key |
Uniquely identifies the definition record. You must have one and only one primary key field per business object. The field must contain a value (NULL is not allowed). The values must be unique. The application automatically sets the primary key to RecID. See Indexing Business Objects for information about indexing. |
|
Display |
A field to show with this business object. For example, you can select CreatedBy to show in conjunction with the incident business object. |
|
State |
The field to use for driving the lifecycle of the processes in the business object. When the object is assigned a certain status, for example, certain business rules might be executed. |
|
Type Selector |
The type selector. Choose a field from the drop-down list to facilitate the extension of the business object. You must select a field to permit a business object to extend. |
| Transaction Audit Log | |
| Audit Create/Update/Delete Events | Adds information from this business object to the audit log each time a business object record is created, modified, or deleted. |
 , then click
 5.Click Save. The application creates the business object, including the following default fields:
•CreatedBy
•CreatedDateTime
•LastModBy
•LastModDateTime
•LastSyncDateTime (only for external business objects)
•ReadOnly
•RecId
6.To automatically create a workspace for this business object, click Auto Generate UI. The application displays the Name dialog box.
7.Enter a name for the layout (or use the application-generated name), then click OK. A new form, list, and layout is created, as indicated by the corresponding tab labels.
8.To modify these, see Using Forms, Working with Lists, and Using Layouts.
9.Click Save.
Business Object Tabs
The following tabs are generated with this business object:
•Details: The main page of the business object. Includes name, description, primary key identifier, and other basic information.
•Fields: Information about the types of fields stored in a business object. See Working with Fields.
•Relationships and Named Relationships: When a business object must include information from another business object, create a relationship between the business objects. See Relationship Types. Each relationship contains a parent business object (the center of the relationship) and a child object that assists a parent object by supplying it with additional data.
•Forms: A graphical display used to present and capture field information. One or many forms compose a record. See Using Forms.
•Lists: A tabular display for viewing multiple records at once. Columns represent the fields for each record. See Working with Lists.
•Layouts: A collection of forms, tabs, lists, and controls that displays a parent record and its child records. The parent record displays as a form with its child records usually displayed as a series of tabs. See Using Layouts.
•Business Rules: Governs events based on user input forms. Business rules define triggering events, actions triggered by an event, and characteristics of user input forms pertaining to the business object. See Using Business Rules.
•Workflows: Workflows organize one or more business processes (sets of activities that perform a specific task) and are triggered by a user action, a time-based event, or additional business process. See Using Workflows.
•Search: Defines how search results from a link field selector are displayed. Sets up advanced search fields for users to search. See Configuring Search Settings.
•ERD: An entity relationship diagram. See Using an Entity Relationship Diagram (ERD).
•Saved Searches: Lists the saved searches associated with this business object. See Using Saved Searches.
•Quick Actions: Opens the Quick Action Center and lists the quick actions associated with this business object. See Using Quick Actions.
•Templates: Lists the quick action templates associated with this business object.
•Pick Lists: Lists the pick lists associated with this business object. See Accessing a Pick List.
•Roles: Lists the roles associated with this business object. See Viewing Roles.
•Indexes: Displays the indexes. See Indexing Business Objects.
•Audit: Store changes made to the records in this business object. The audit history for an individual record is then displayed as a tab. See About Accessing the Audit History.
•Permissions:
Creating a Group Business Object
A group business object consists of an abstract base type and one or more derived types. A configuration item is one example of a group business object type. The configuration item group subtypes, such as workstations, servers, printers, and so on, derive fields and relationships from the configuration item base type. This allows you, for example, to use a search to gather information about all the derived business objects and display them in a list or on a dashboard. For example, printer, workstation, server, and so on are all separate business objects. Without connecting these different business objects under a group, you cannot search across, or list these business objects together. Connecting them to the group business object as derived business objects allows you to do this.
In past releases it was sometimes possible to use abstract base type in business logic, without defining any derived types. Beginning with Neurons for ITSM Release 2016.1, this is no longer allowed.
1.From the Configuration Console, click Build > Business Objects. The application displays the Business Objects workspace.
2.From the right panel in the Create an Object pane, click New Object. The application displays the Business Object: Create New page.
3.Click Group Business Object. The application displays the Business Object Create New page.
4.Under the Details tab, enter information into the fields.
| Field | Description |
|---|---|
|
Business Object |
A unique name for this business object. The name is stored in the database. |
|
Display Name |
A unique display name for this business object. This name appears to users in the Neurons for ITSM application. |
|
Description |
A brief description of the purpose of the business object. |
|
Default Form |
Optional. The default form for this business object. Choose from the drop-down list. You cannot set a default form until you have created at least one form for this business object. See Using Forms. |
|
Default Search |
Optional. The default saved search for this business object. Choose from the drop-down list. You cannot set a default saved search until you have created at least one saved search for this business object. See Creating a Saved Search. If there is already a default saved search for the business object for a role, that takes precedence over the value entered in this field for users logged in as that role. |
| External Object Synchronization | |
| External |
Defines if this is an external business object, which means that the data comes from an external application. For more information about using external business objects, see Using Web Services with External Data Sources.
NOTE: You can only apply this property when you originally create the business object. You cannot apply this property to an existing business object. You cannot set an existing business object to external; instead, you have to create a new business object. Therefore you do not see this section when viewing or editing a business object; only when creating it. |
| External Primary Key |
(Only shown if you checked External.) The primary key used by the external application.
You cannot specify this field when you originally create the external business object. You first need to add the primary key field to the business object (see Creating a Field) and then come back to this page and set this value to the new field that you created. When you create the field to be used as the external primary key, ensure that you check Unique.
You can also create an index and use that as the external primary key. See Adding Indexes. |
| Synchronized |
(Only shown if you checked External.) Specifies if you can use a cached version of the data. If you check this option, the application retains a cache of the external data and uses that. If you do not check this option, the application always goes to the external application and uses that data. |
| Refresh Interval |
(Only shown if you checked Synchronized.) The time, in minutes, after which the application tries to refresh the data from the external application.
This value must be less than or equal to the value of the Time To Live parameter. On-premise users can change the minimum and maximum values of this parameter by updating the web.config file; however, the minimum value cannot be less than one minute. |
| Time To Live | (Only shown if you checked Synchronized.) The time, in minutes, that the data has left before you must refresh the data. If the data is older than this value, the application does not let you use it or save any business objects that use this data. The application displays a message that the data is stale and you must refresh it. |
| Usage Qualifiers | |
|
Commonly Used |
Shows this business object on the Business Objects workspace. |
|
Under Change Control |
When working with a business object derived from the CI and FRS_CIComponents business objects, check to allow its configuration baseline attributes to be copied. |
| Special Purpose Fields | |
|
Primary Key |
The application automatically sets the primary key to RecID. See Indexing Business Objects for information about indexing. |
|
Display |
A field to show with this business object. For example, you can select CreatedBy to show in conjunction with the Incident business object. |
|
State |
The field to use for driving the lifecycle of the processes in the business object. When the object is assigned a certain status, for example, certain business rules might be executed. |
|
Type Selector |
Created automatically based on the business object. The type selector field is only shown for the group-base and group-member business objects. |
| Transaction Audit Log | |
| Audit Create/Update/Delete Events | Adds information from this business object to the audit log each time a business object record is created, modified, or deleted. |
5.Click Save. The application creates the business object, including the following default fields visible on the Fields tab:
•CreatedBy
•CreatedDateTime
•LastModBy
•LastModDateTime
•NewBusinessObjectType
•ReadOnly
•RecId
6.To automatically create a workspace for this business object, click Auto Generate UI. The Name window appears.
7.Enter a name for the layout (or use the application-generated name), then click OK. A new form, list, and layout is created, as indicated by the corresponding tab labels.
8.To modify these, see Using Forms, Working with Lists, and Using Layouts.
9.Click Save.
Business Object Tabs
The following tabs are generated with this business object:
•Details: The main page of the business object. Includes name, description, primary key identifier, and other basic information.
•Fields: Information about the types of fields stored in a business object. See Working with Fields.
•Relationships: When a business object must include information from another business object, create a relationship between the business objects. See Relationship Types. Each relationship contains a parent business object (the center of the relationship) and a child object that assists a parent object by supplying it with additional data.
•Forms: A graphical display used to present and capture field information. One or many forms compose a record. See Using Forms.
•Lists: A tabular display for viewing multiple records at once. Columns represent the fields for each record. See Working with Lists.
•Layouts: A collection of forms, tabs, lists, and controls that displays a parent record and its child records. The parent record displays as a form with its child records usually displayed as a series of tabs. See Using Layouts.
•Business Rules: Governs events based on user input forms. Business rules define triggering events, actions triggered by an event, and characteristics of user input forms pertaining to the business object. See Using Business Rules.
•Workflows: Workflows organize one or more business processes (sets of activities that perform a specific task) and are triggered by a user action, a time-based event, or additional business process. See Using Workflows.
•Search: Defines how search results from a link field selector are displayed. Sets up advanced search fields for users to search. See Configuring Search Settings.
•ERD: An entity relationship diagram. See Using an Entity Relationship Diagram (ERD).
•Saved Searches: Lists the saved searches associated with this business object. See Using Saved Searches.
•Quick Actions: Opens the Quick Action Center and lists the quick actions associated with this business object. See Using Quick Actions.
•Templates: Lists the quick action templates associated with this business object.
•Pick Lists: Lists the pick lists associated with this business object. See Accessing a Pick List.
•Roles: Lists the roles associated with this business object. See Viewing Roles.
•Indexes: Displays the indexes. See Indexing Business Objects.
•Audit: Store changes made to the records in this business object. The audit history for an individual record is then displayed as a tab. See About Accessing the Audit History.
•Permissions:
Creating an Extension to an Existing Business Object
•About Creating an Extension to an Existing Business Object
•Creating an Extension to a Group Business Object
About Creating an Extension to an Existing Business Object
You can embed a single business object into a parent business object. For example, the group business object called Task contains a set of common fields (business properties), such as:
•EstimatedEffort
•ActualStartDate
•EmailAddress
However, you can create one or more extensions of Task, extended business objects that are member business objects. The base business object (Task) has its business properties extended into these business objects without recreating the fields separately for each extended business object. The extended business objects can then gather more specific information, such as:
•Task.Assignment: Contains fields such as PlannedCost, AssignmentID, and AssignerEmail.
•Task.WorkOrder: Contains fields such as ActualCost, EstimatedCost, and WorkOrderID.
An extended business object (such as Task.WorkOrder) can be a member of a business object group.
Creating an Extension to a Group Business Object
1.From the Configuration Console, click Build > Business ObjectsThe application displays the Business Objects workspace.
2.From the right panel in the Create an Object pane, click New Object. The application displays the Business Object: Create New page.
3.Click Extension To Group Business Object. The Create Extension page appears.
4.From the list, choose the business object to extend. The Details page for the business object appears, showing the parent business object link.
5.Click the link to review the parent business object properties.
6.Enter information into the fields.
| Field | Description |
|---|---|
| Extension To | The parent business object name. Automatically generated by the application. |
|
Suffix Name |
A name for the member business object, relative to the group object. |
|
Display Name |
The default display name (objectname.suffixname). Automatically generated by the application. |
|
Description |
Describes the business object. |
|
Default Form |
Optional. The default form for this business object. Choose from the drop-down list. You cannot set a default form until you have created at least one form for this business object. See Using Forms. |
|
Default Search |
Optional. The default saved search for this business object. Choose from the drop-down list. You cannot set a default saved search until you have created at least one saved search for this business object. See Creating a Saved Search. If there is already a default saved search for the business object for a role, that takes precedence over the value entered in this field for users logged in as that role. |
| Usage Qualifiers | |
|
Commonly Used |
Shows the business object in the Common Objects area of the main Business Objects page. |
|
Under Change Control |
When working with a business object derived from the CI and FRS_CIComponents business objects, select the option to allow its configuration baseline attributes to be copied. |
| Pure Validation Object | Specifies if this is a pure validation object, which indicates that the given business object is used primarily to drive the drop-down fields in other business objects. |
| Special Purpose Fields | |
| Primary Key | The primary key. |
|
Display |
The display name with this business object. For example, you could select IncidentNumber to be displayed in conjunction with the Incident business object. |
|
State |
Drives the lifecycle of the processes in the business object. When the business object is assigned a certain status, for example, certain business rules might be executed. |
|
Type Selector |
Facilitates the extension of the business object. You must select a field to permit a business object to be extended. |
| Transaction Audit Log | |
| Audit Creates/ Update/ Deletes | Adds information from this business object to the audit log each time a business object record is created, modified, or deleted. |
7.Click Save. Neurons for ITSM creates the business object and generates the fields. See Business Object Tabs.
Creating a Materialized View Business Object
This business object type is used for establishing a universal worklist. See Working with a Universal Worklist for information about how to use this feature.
1.From the Configuration Console, click Build > Business Objects. The application displays the Business Objects workspace.
2.From the right panel in the Create an Object pane, click New Object. The application displays the Business Object: Create New page.
3.Click Materialized View Business Object. The New Business Object page appears.
4.Enter information into the fields.
| Field | Description |
|---|---|
|
Business Object |
A unique name for this business object. The name is stored in the database. |
|
Display Name |
A unique display name for this business object. This name appears to users in the Neurons for ITSM application. |
|
Description |
A brief description of the purpose of the business object. |
5.Click Save. Neurons for ITSM creates the business object and the tabs appear.
This defines the structure into which you copy data. Neurons for ITSM automatically generates application fields for this business object, but in reality you will probably not use them.
6.From the View Fields tab, click Add Fields From. The Import Fields window appears.
7.Enter information into the fields.
| Field | Description |
|---|---|
| From child Tenant | Gets data from the child tenant. This enables the next field. If not checked, you can only get data from the parent tenant. |
| Tenant | The child tenant. Choose from the drop-down list. These are defined in the Child Tenant workspace. See Creating a Child Tenant. |
| Business Object | The business object whose fields to import and map. |
The fields are listed, but only the physical fields are selected. Calculated and Boolean fields are grayed out.
8.To select all valid fields, check Select All Fields.
9.Click Import. The fields are created for the new business object and appear in the field list.
10. To add fields from another tenant, click Add Fields From and repeat the process. Neurons for ITSM only creates unique fields; duplicate fields are automatically ignored.
11. Click Save. The view fields are created. This might take a couple of minutes, depending on how many fields are added.
Viewing Parts for a Materialized View Business Object
This tab lists any view parts for the Materialized View business object. You can create multiple view parts from a single tenant.
1.From the View Part tab, click Add New.... The New Part page appears.
View Part: New Part Page
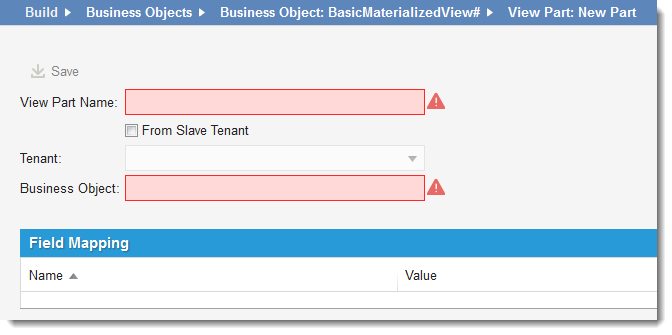
2.Enter information into the fields.
| Field | Description |
|---|---|
| View Part Name | A unique name for the view part. |
| From Child Tenant | Gets data from the child tenant. This enables the next field. If not checked, you can only get data from the parent tenant. |
| Tenant | The child tenant. Select from the drop-down list. These are defined in the Child Tenant workspace. See Creating a Child Tenant. |
| Business Object | The related business object. Enter part of the name and a list of business objects appears in the list. The fields are mapped automatically if the part field name matches the tenant field name. |
3.Map the fields if needed.
4.Click Save.
5.Return to the View Parts page. Your new part appears in the list.
6.Under the Actions column, click Build. The source data is compiled and ready to use.
The following actions are now available:
| Action | Description |
|---|---|
| Synchronize | Retrieves any updated data. |
| Deactivate | Removes this object from the synchronization process. |
| Destroy | Removes all traces of the part from user computers. |
Delete  |
Removes all field mapping. |
About Modifying a Business Object
Use caution when modifying a business object. Changing business objects that have been linked to other business objects or that are required in a workflow can cause unexpected results and prevent your application from running correctly. We recommend that you only modify business objects that you have created.
Deleting a Business Object
You cannot delete default business objects; you can only delete business objects that you have created.
Use caution when deleting a business object as you might inadvertently affect a workflow or relationship with another object.
1.From the Configuration Console, click Build > Business Objects. The application displays the Business Objects workspace.
2.Click View All to see a list of objects. The objects you can delete appear without a lock in front of the name and with a delete icon enabled.
Business Objects That Can Be Deleted
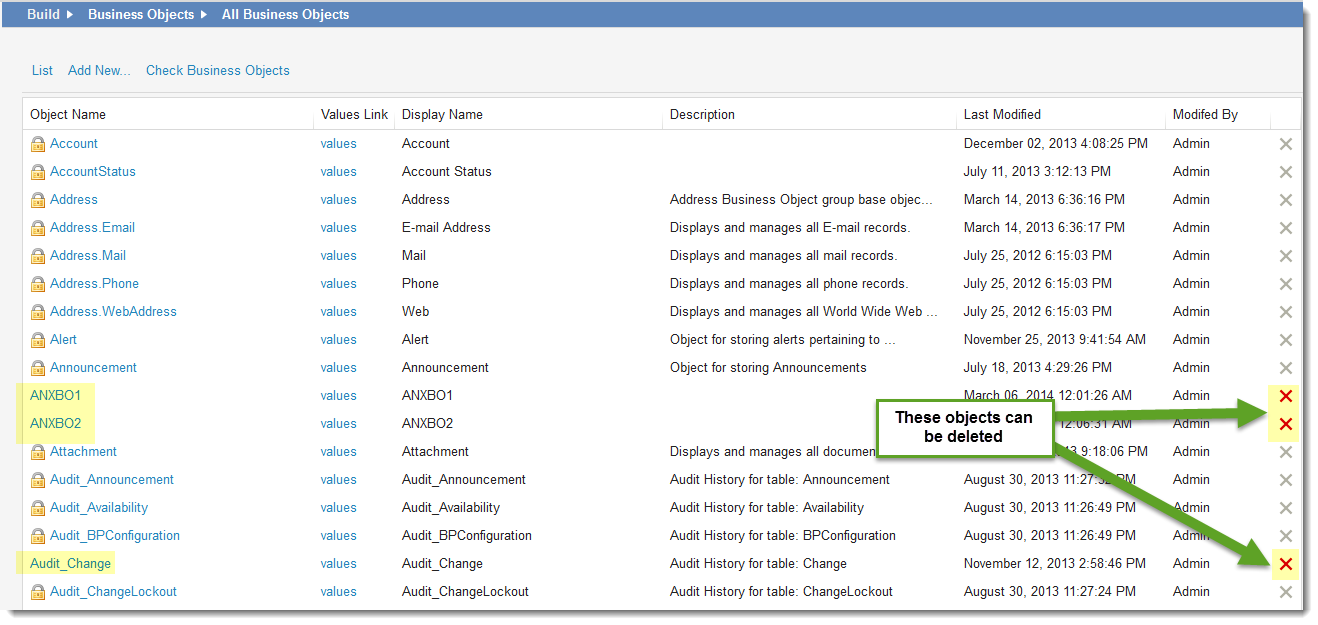
3.For the business object to delete, click the delete icon . The Delete Confirmation window appears.
4.Click Yes. The business object no longer appears on the list.
Auditing a Business Object
You can view the history of a specific business object from the Audit tab. This is in addition to the transaction audit log. See About the Transaction Audit Log.
Audit Tab
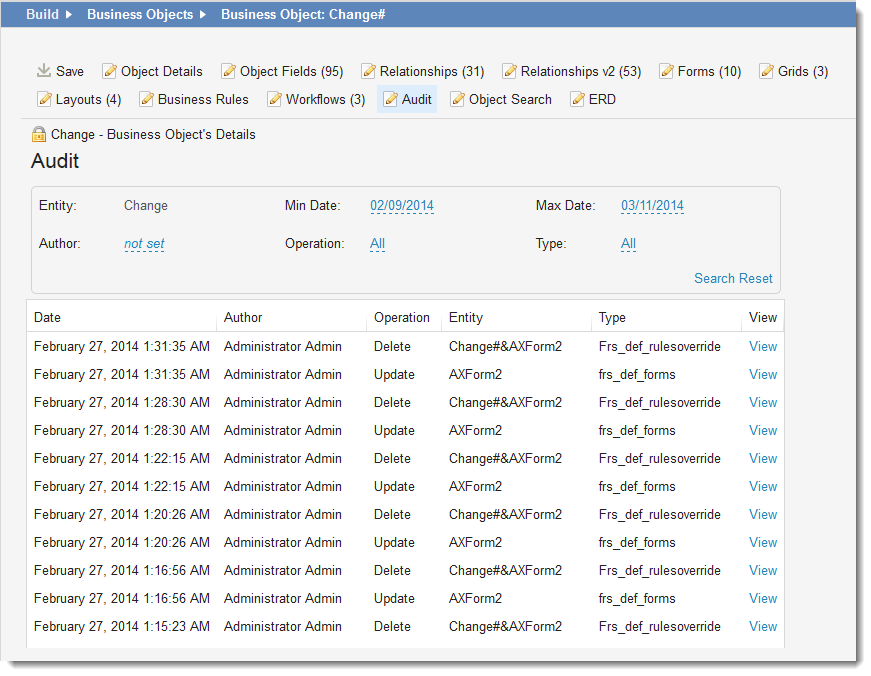
1.You can filter which items appear on the list:
| Filter | Description |
|---|---|
| Author | The name of the author. Choose from the drop-down list. |
| Min Date | The earliest date to search. |
| Operation |
The audit operation. Select from the drop-down list: All Insert Update Delete |
| Max Date | The latest date to search. |
| Type | The type. Select from the drop-down list. |
2.Click Search after setting your filter settings to see the audit items.
3.Click Reset to clear all the filter fields and see all of the audit items.
Adding Custom Tabs Using Plugins
•Adding a Custom Tab Using Try Our New Look
About Plugins
You can add a custom tab to certain business objects using plugins. Plugins are ways to extend and add to the functionality that already exists in the business objects.
Plugins are available for the following business objects:
| Plugin Name | Use with This Business Object |
|---|---|
| Release Schedule | Release |
| Service Request Parameters | Service Request |
| Change Schedule |
Change |
| Risk Level | Change |
| Baseline Comparison | CI |
| Gantt Chart | multiple |
This information in this section explains two different ways to add a custom tab using plugins:
•Adding a Custom Tab Using Try Our New Look
Adding a Custom Tab
Follow these steps to add a custom tab to a business object:
1.From the Configuration Console, click Build > Business Objects. The application displays the Business Objects workspace.
2.Click on the Release, Service Request, or Change business object. This example uses the Change business object .
3.Click the Layouts tab.
4.Click the name of a layout associated with the selected business object.
5.In the Views in this layout section, click formView. The Form View Editor [formView] workspace displays.
6.Click Add Custom Child Panel.
7.In the Display Name column, enter a name for the new tab.
8.In the Object column, select a plugin from the drop-down list.
9.Click Save.
10.Return to the Neurons for ITSM Application and refresh the browser.
11.Verify that the new custom tab displays.
Adding a Custom Tab Using Try Our New Look
You can also add a custom tab using Try Our New Look  . Follow these steps to add a custom tab:
1.From the Configuration Console, click Build > Business Objects. The application displays the Business Objects workspace.
2.Open the Release, Service Request, or Change business object. This example uses the Change business object.
3.Click the Layouts tab.
4.Open a layout.
5.In the Views in this layout section, click formView. The application displays the Form View Editor [formView] page.
6.Click Try our new look!.
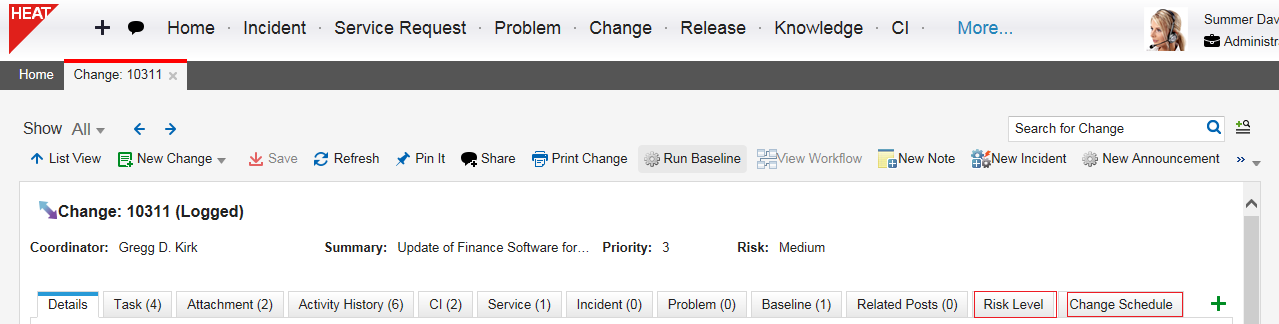
7.On the left side under Toolbox, expand Plugins to show the available plugins associated with the selected business object. The Change business object includes Change Schedule and Risk Level.
8.Select a plugin and drag and drop it to the right pane to make it a subtab.
9.You can make the subtab closable by following the steps in Making a Tab Closable.
10.Click Save.
11.Return to the Neurons for ITSM Application and refresh the browser.
12.Open the business object and open an item to verify that the your selections display in the subtab area.
Custom Tabs from a Plugin
Making a Tab Closable
You can make child and custom panels closable or non-closable. If you can close a child or custom panel, the application displays a delete icon to the right of the name. When you mouse over the delete icon , it changes to red indicating it is enabled.
The tab status remains in the same state during navigation. See the note at the end of this section.
Examples of the Delete Button Used to Make a Tab Closeable

Follow these steps to make a custom tab closable:
1.From the Configuration Console, click Build > Business Objects. The application displays the Business Objects workspace.
2.Open a business object.
3.Click the Layouts tab.
4.Open a layout.
5.In the Views in this layout section, click formView.
6.In the Display Name column under the Child Panels section locate the tab to make closeable.
7.On the right side, check the box in the Closable column.
8.Click Save.
9.Return to the Neurons for ITSM Application and refresh the browser.
10.Click the name of the business object that you selected in step 2 to display the business object workspace.
11.Open a record.
The tab you selected in step 6 now includes a delete icon .
The delete icon only shows on this tab for the current business object. If you close this tab for this business object and then open another business object, the application displays the tab for the new business object even though you previously closed the tab for the original business object.
Deleting a Custom Tab
You can delete a custom tab from a business object by following these steps:
1.From the Configuration Console, click Build > Business Objects. The application displays the Business Objects workspace.
2.Open a business object.
3.Click the Layouts tab.
4.Open a layout.
5.In the Views in this layout section, click formView.
6.In the Display Name column, highlight the child panel to delete and click the delete icon.
7.Click Save.
8.Return to the Neurons for ITSM Application and refresh the browser.
9.Verify that the custom tab that you selected is removed.